


⛵ Sailing & Nautical
Essential Sailing Knots: 7 Must-Know Knots for Sailors (2026)
Oct
Essential Sailing Knots: 7 Must-Know Knots for Sailors (2026)
The 7 essential sailing knots every sailor needs, explained with clear steps, real on-deck uses, common mistakes, and practical safety tips.
Why These 7 Sailing Knots Matter
Every sailor eventually faces the same moment: a line needs to hold, right now, with no time to improvise. Sailing knots exist because generations of sailors solved that problem before you did — and the solutions they landed on are still the fastest, most reliable ones available today.
This guide covers the seven sailing knots that handle the overwhelming majority of on-deck tasks: the bowline, clove hitch, cleat hitch, figure-eight stopper, rolling hitch, sheet bend, and round turn and two half hitches. These seven aren’t an arbitrary list — together they cover every core function a sailor needs from rope: forming a loop, attaching to an object, stopping a line, gripping a loaded rope, and joining two ropes.
For each knot, you’ll find what it does, when to actually reach for it, exactly how to tie it step by step, the most common beginner mistake, and a practical safety consideration. Nothing here is theoretical — every knot below is something you can practice tonight on a scrap length of line and use on the water tomorrow.
A sailor who can tie seven knots well is safer than one who knows fifty tied poorly.
Quick Reference: The 7 Essential Sailing Knots
Bookmark this table. It’s a fast way to recall which sailing knot fits a given job before you dive into the full how-to-tie instructions below.
| Knot | Best For | Difficulty | Main Advantage |
|---|---|---|---|
| Bowline | Forming a secure fixed loop | Beginner | Holds under load, relatively easy to untie afterward |
| Clove Hitch | Quick, temporary attachment to a post or rail | Beginner | Fast to tie and adjust |
| Cleat Hitch | Securing a line to a deck or dock cleat | Beginner | Quick to release under control |
| Figure-Eight Stopper | Preventing a line from running through a block | Beginner | Won’t over-tighten like a simple overhand knot |
| Rolling Hitch | Gripping a rope already under tension | Intermediate | Resists sliding along the direction of pull |
| Sheet Bend | Joining two ropes, especially different diameters | Beginner–Intermediate | Handles mismatched rope sizes better than a square knot |
| Round Turn & Two Half Hitches | Securing a line to a post or ring long-term | Beginner | Round turn absorbs shock before the hitch locks off |
The 7 Essential Sailing Knots
Each knot below follows the same format so you can scan quickly: a diagram, what it does, where it’s used, when to reach for it, how to tie it step by step, the mistake that trips up most beginners, and one practical safety note.
How to Tie a Bowline: The Essential Sailing Loop
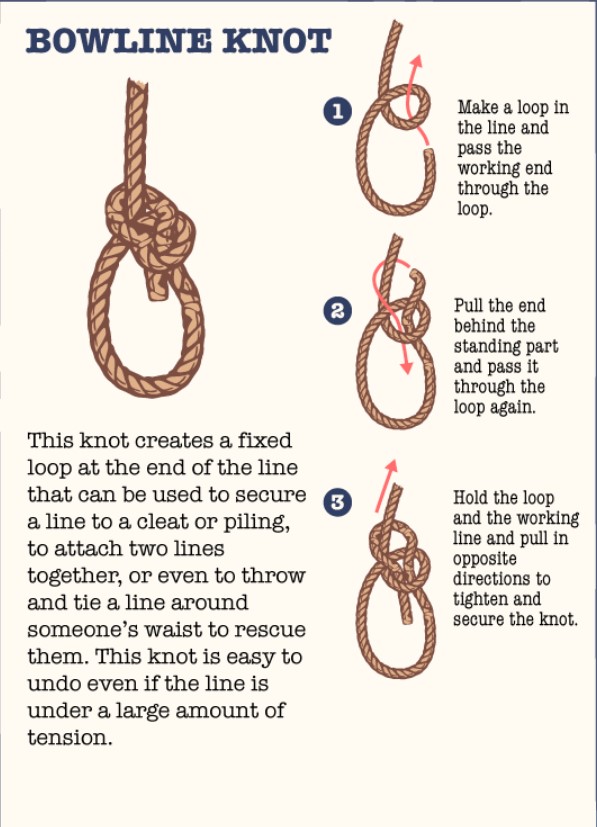
Step-by-step diagram: tying a bowline knot
The bowline forms a fixed loop at the end of a rope. It’s one of the most widely taught sailing knots because it holds securely under load while generally remaining easier to untie afterward than most other loop knots.
Best usesMooring lines, attaching a line to a ring or post via a loop, forming an eye for towing, and securing a loop in a safety line or harness tether (ideally backed up — see safety tip below).
When should you use it?Use a bowline whenever you need a loop that must hold firmly but that you’ll need to untie again later — docking, rigging a temporary towline, or dropping a loop over a piling.
How to tie itLay the working end over the standing part to form a small loop a few inches from the end (the “rabbit hole”).
Pass the working end up through the loop from underneath.
Wrap the working end behind the standing part, going all the way around it.
Bring the working end back down through the original loop, following the same path it came up through.
Pull the standing part and the loop at the same time to snug every strand into place.
Tighten the tail firmly to finish the knot.
Clove Hitch
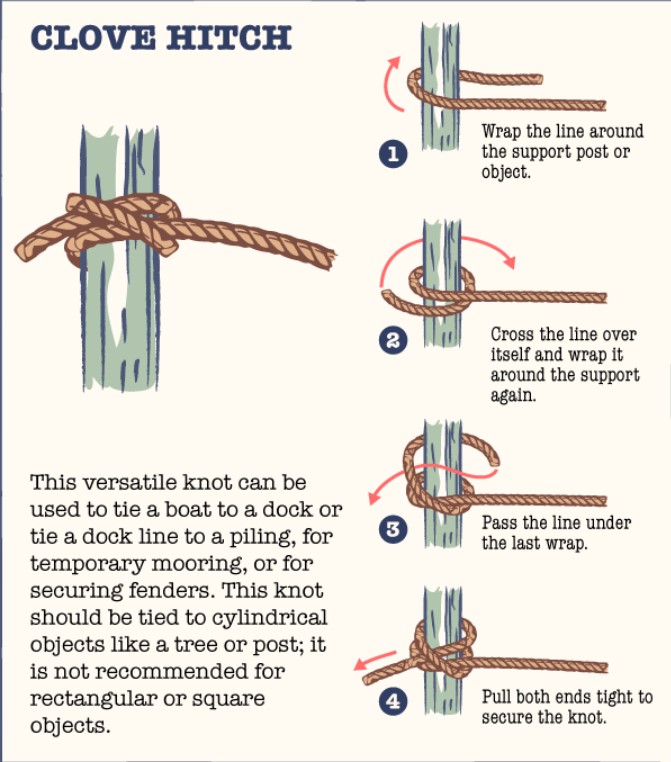
Step-by-step diagram: tying a clove hitch
The clove hitch attaches a line to a post, rail, or piling using two stacked half hitches. It’s fast to tie and, just as importantly, fast to adjust.
Best usesTemporarily securing fenders to a lifeline or rail, quickly tying off to a piling while docking lines are sorted out, and as a starting hitch in various marlinspike seamanship tasks.
When should you use it?Use it for quick, temporary attachments where you’ll likely need to adjust or release the line soon — not as a long-term mooring solution.
How to tie itWrap the rope once around the post, crossing over itself.
Wrap a second time around the post, above the first wrap.
Tuck the working end under the last wrap, pinning it between the rope and the post.
Pull both ends to snug the hitch tight against the post.
Cleat Hitch
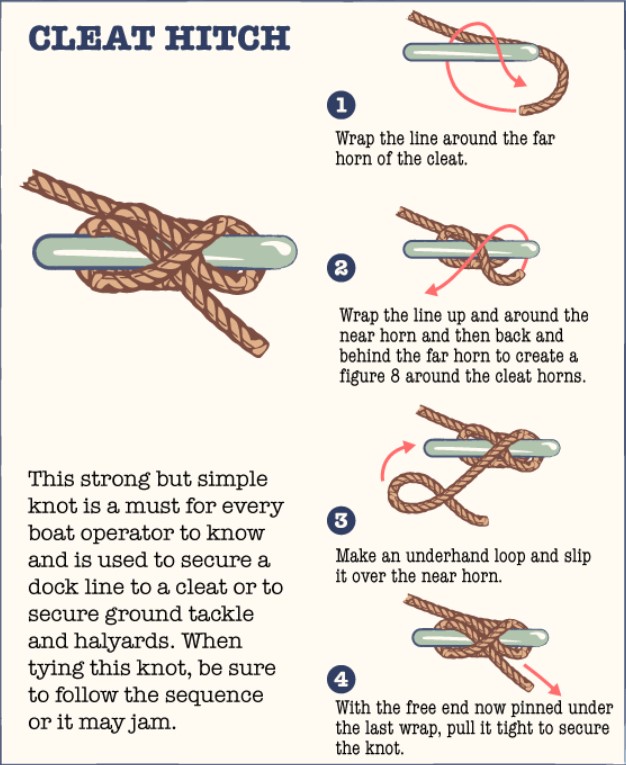
Step-by-step diagram: tying a cleat hitch
The cleat hitch is the standard method for securing a line to a deck or dock cleat using a figure-eight wrapping pattern finished with a locking turn.
Best usesDocking lines, halyards cleated at the mast, and any running rigging secured to a cleat rather than a winch.
When should you use it?Anytime a line needs to be fastened to a cleat — this is the default technique for nearly every cleat you’ll encounter aboard.
How to tie itTake a full turn around the base of the cleat, farthest from the direction of pull.
Cross the line over the top to form a figure-eight pattern around the horns, repeating once or twice.
Finish with a locking hitch: form a small loop and flip it over one horn so the final wrap is pinned under itself.
Snug it down so the load sits on the base turn, not the locking hitch.
Figure-Eight Stopper
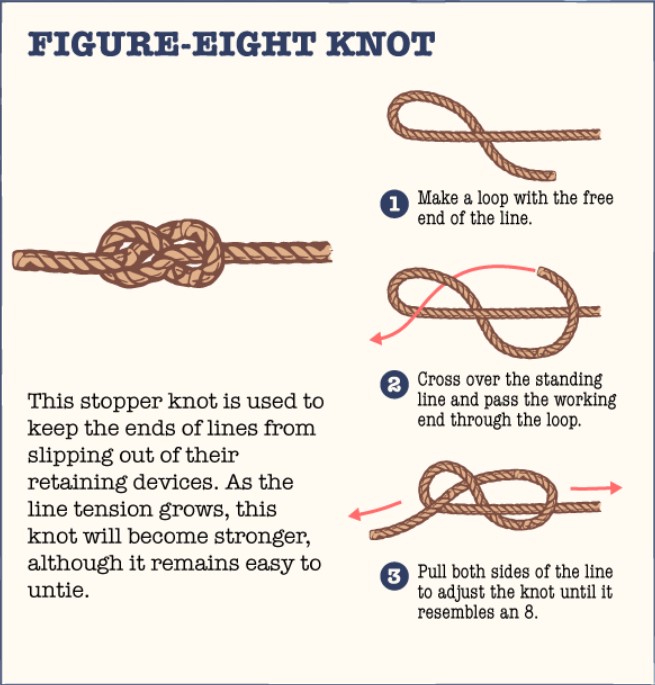
Step-by-step diagram: tying a figure-eight stopper
A stopper knot tied into the end of a line to prevent it from running out through a block, fairlead, or turning point. It’s bulkier than an overhand knot but far less prone to jamming tight.
Best usesSheet ends, halyard tails, and any running line where an uncontrolled end could slip through hardware and run free.
When should you use it?Tie one into the working end of any line you don’t want to lose through a block — most commonly jib sheets and halyards.
How to tie itForm a loop in the rope near the end.
Bring the working end around behind the standing part.
Feed the working end down through the loop formed in step one.
Pull both ends to tighten the knot into a compact figure-eight shape.
Rolling Hitch
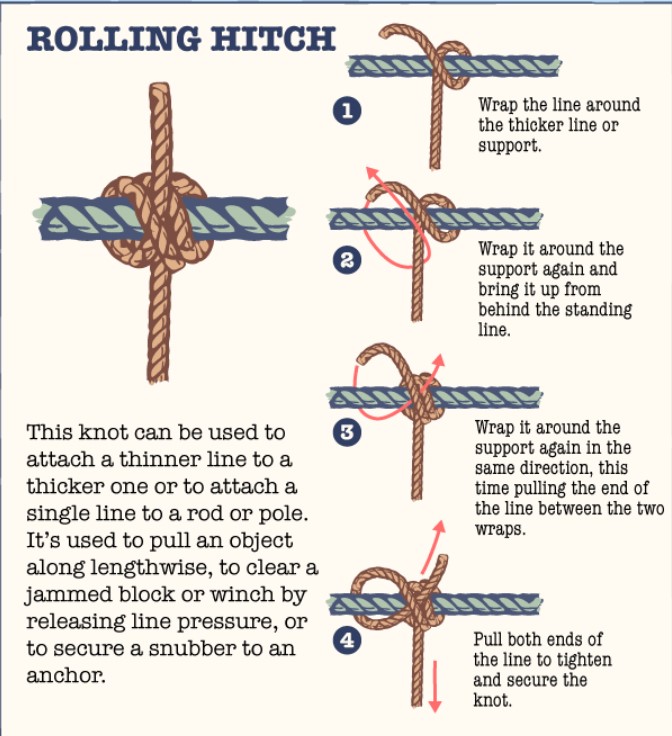
Step-by-step diagram: tying a rolling hitch
The rolling hitch grips a rope, rail, or spar under tension and resists sliding along the direction of pull — something a basic clove hitch can’t reliably do.
Best usesAttaching a second line to a loaded sheet or halyard to take over the load (a common technique for clearing a riding turn on a winch), and securing a line to a rail or spar under strain.
When should you use it?Use it specifically when you need to attach a new line to something already under tension — a situation where most other hitches simply slip.
How to tie itMake a riding turn around the loaded rope, with the turn’s direction matching the expected direction of pull.
Add a second riding turn, snugged tightly against the first.
Finish with a locking half hitch on the opposite side from the turns.
Gradually apply load to confirm the hitch grips before fully transferring weight to it.
Sheet Bend
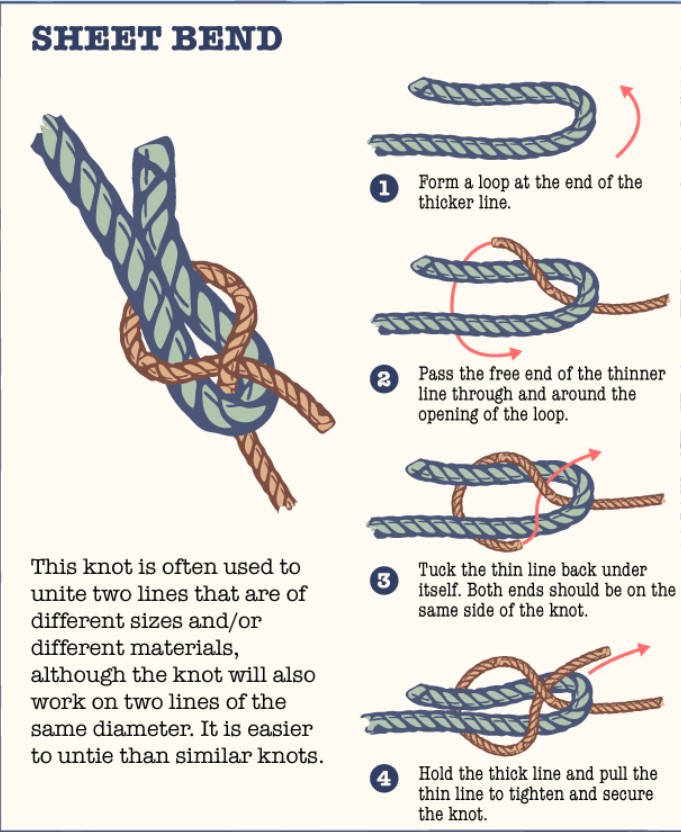
Step-by-step diagram: tying a sheet bend
The sheet bend joins two ropes together, and it handles ropes of different diameters or materials noticeably better than a simple square (reef) knot.
Best usesJoining two dock lines in a pinch, extending a line that’s come up short, connecting a flag halyard, or linking ropes of mismatched thickness.
When should you use it?Whenever you need to connect two separate lines — especially if they’re not the same diameter, where a square knot is more likely to slip.
How to tie itForm a bight (a simple U-shaped loop) in the thicker of the two ropes.
Pass the working end of the thinner rope up through the bight.
Wrap it around behind both legs of the bight.
Tuck the working end back under itself on the same side it came from, and pull snug.
Round Turn and Two Half Hitches
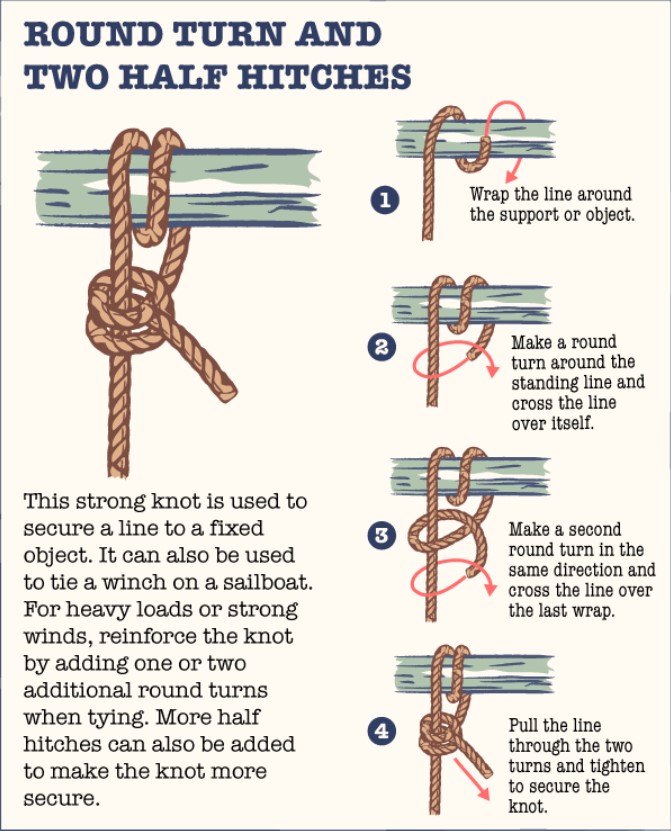
Step-by-step diagram: tying a round turn and two half hitches
This hitch uses a full turn around a post, ring, or piling to absorb the initial load through friction before locking off with two half hitches.
Best usesSecuring a mooring line to a piling or ring for an extended stay, tying off fenders, and any application where the line will be under sustained load or subject to surge.
When should you use it?Choose this hitch when a line will be left unattended or under load for a while — the round turn absorbs shock, so the hitches aren’t bearing the full strain alone.
How to tie itPass the rope completely around the post or ring — a full 360-degree turn, not just a half wrap.
Bring the working end over the standing part and tuck it under to form the first half hitch.
Repeat the same motion just below it to form a second half hitch.
Snug both hitches down against the round turn.
Which Sailing Knot Should You Use?
Several of these knots can technically work in overlapping situations — treat this as a starting point, not an absolute rule.
- Need a fixed loop that must hold but may need untying later: Bowline.
- Need to temporarily attach a line to a post or rail: Clove Hitch — not for unattended, long-term holding.
- Need to secure a line to a deck or dock cleat: Cleat Hitch.
- Need to stop a line from running through a block or fairlead: Figure-Eight Stopper.
- Need to attach a new line to a rope already under tension: Rolling Hitch.
- Need to join two ropes, especially different diameters: Sheet Bend — use a double sheet bend for mismatched or slick rope.
- Need to secure a line to a post, ring, or piling long-term: Round Turn and Two Half Hitches.
Common Sailing Knot Mistakes
Most knot failures trace back to a short list of avoidable habits rather than a flawed knot choice. Watch for these on your own deck.
- Not dressing the knot before loading it: a technically correct knot that isn’t snugged into shape is more likely to slip or jam.
- Leaving too short a tail: most sailing knots need at least four to six inches of working end to resist working loose under vibration.
- Mixing rope types without adjusting the knot: a hitch that holds on stiff, grippy line can slip on slick, low-friction rope.
- Treating a knot as permanent once tied: lines under sustained load, sun exposure, or repeated flexing should be checked periodically.
- Over-wrapping a cleat hitch or jamming a hitch with extra turns: this makes a knot harder to release exactly when speed matters.
How to Practice Sailing Knots
- The dock cleat: practicing a real cleat hitch on a real cleat builds muscle memory that transfers directly to docking under pressure.
- A length of scrap line at home: ten minutes a night with a short practice line builds speed and confidence faster than occasional on-water sessions alone.
- Sailing school deck sessions: structured courses through organizations like the American Sailing Association or Royal Yachting Association pair knot instruction with real sailing scenarios.
- Dinghy sailing: small boats demand constant line handling, making them a useful low-stakes environment to repeat these seven knots often.
- Offshore or night practice: once comfortable, practicing in the dark or in rolling conditions prepares you for the moments these knots matter most.
Rope and Knot-Tying Basics
Rope Construction
Three-strand laid rope — fibers twisted together in a spiral — grips most hitches firmly and is common for anchor rode and dock lines. Double-braid rope, with a braided core inside a braided cover, is stronger for its diameter and runs more smoothly through blocks, which is why it’s typical for halyards and sheets.
Some knots behave differently depending on construction: a clove hitch that holds on stiff three-strand can slip on slicker double-braid line, which is one reason experienced sailors test a new knot on the actual rope they intend to use.
Reading a Knot Diagram
Three terms cover almost every instruction you’ll encounter: the standing part (the main length of rope not being actively worked), the working end (the end you’re tying with), and a bight (a simple curve made without crossing the rope over itself). Once these are second nature, almost any knot diagram becomes readable at a glance.
Useful Gear for Knot-Tying
Stretches under load to absorb shock, making it the standard choice for anchor rode and dock lines.
Low stretch and high UV resistance make it ideal for halyards and sheets needing precise control.
A tapered metal or wood tool for loosening jammed knots and working splices without damaging fibers.
A folding deck knife for cutting line quickly in an emergency, often paired with a built-in spike.
Reinforced palms protect hands while tying and tensioning knots under real load conditions.
Waxed twine used to bind a rope’s end, preventing fraying before it’s worked into a knot.
Sailing Knot Safety
Every knot reduces a rope’s overall breaking strength because the bend concentrates stress at that point. Published knot-tying references commonly suggest a well-tied bowline retains somewhere in the range of 60–70% of a rope’s straight-line strength, but this figure is not universal — actual retained strength varies with rope material, construction, diameter, how well the knot is dressed, and the testing method used. [VERIFY SOURCE] Treat any single percentage as a rough guide, not a guarantee for your specific rope.
Before loading any line, take a moment to check its length for chafe, fraying, stiffness, or glazing from friction — a correctly tied knot cannot compensate for compromised rope. There’s no universal replacement schedule; base it on visible wear, UV exposure, and how hard the line is used rather than age alone.
The US Coast Guard’s recreational boating safety program lists proper equipment handling, including line work, as a core safety pillar. The American Sailing Association and Royal Yachting Association both build beginner curricula around a short list of core knots rather than broad memorization — a strong signal that depth with a few knots beats breadth with many.
Frequently Asked Questions
The bowline, clove hitch, cleat hitch, figure-eight stopper, rolling hitch, sheet bend, and round turn and two half hitches. Together they cover forming a loop, temporary and long-term attachment, stopping a line, gripping a loaded rope, and joining two ropes — the core functions needed aboard almost any sailboat.
The bowline. It forms a secure loop that holds under load yet is generally easier to untie afterward than most alternatives, and it’s used constantly for mooring, towing, and rigging.
The sheet bend, particularly when the two ropes are different diameters. For mismatched sizes or slick synthetic line, a double sheet bend (one extra wrap) adds security.
The cleat hitch — a figure-eight wrapping pattern around the cleat horns finished with a locking turn. It’s quick to tie and, done correctly, quick to release under control.
A knot is typically tied in a single rope, like a bowline or figure-eight. A hitch attaches a rope to another object, such as a cleat or piling. A bend joins two separate ropes together, like a sheet bend. All three fall under the general term “sailing knots” in everyday use.
Yes. Any knot reduces a rope’s breaking strength because the bend concentrates stress at that point. The exact amount varies by rope and knot, which is why minimizing unnecessary knots in load-bearing lines is good practice.
Yes, under the wrong conditions. Short tails, vibration, cyclical loading, or an incorrectly dressed knot can all cause a knot to work loose over time, which is why tail length and periodic inspection matter as much as the tying technique itself.
There’s no fixed interval — inspect regularly for stiffness, fading, fuzzing, or glazed spots from friction, and replace any line showing these signs regardless of its age. A knot tied in compromised rope can’t be trusted even if tied correctly.
Final Thoughts
You don’t need to know fifty knots to sail well — you need to know these seven cold, and be able to tie each one correctly without overthinking it. Spend a few evenings running through the bowline, clove hitch, cleat hitch, figure-eight stopper, rolling hitch, sheet bend, and round turn and two half hitches on a scrap length of line, and they’ll be ready in your hands exactly when conditions demand them.
Related articles
